iptables
iptables is a command line utility for configuring Linux kernel firewall implemented within the Netfilter project. The term iptables is also commonly used to refer to this kernel-level firewall. It can be configured directly with iptables, or by using one of the many frontends and GUIs. iptables is used for IPv4 and ip6tables is used for IPv6.
nftables was released in release with Linux kernel 3.13, and will one day replace iptables as the main Linux firewall utility.
1 Installation
The stock Parabola GNU/Linux-libre kernel is compiled with iptables support. You will only need to install the userland utilities, which are provided by the package iptables. (The iproute2 package from the base group depends on iptables, so the iptables package should be installed on your system by default.)
2 Basic concepts
iptables is used to inspect, modify, forward, redirect, and/or drop IPv4 packets. The code for filtering IPv4 packets is already built into the kernel and is organized into a collection of tables, each with a specific purpose. The tables are made up of a set of predefined chains, and the chains contain rules which are traversed in order. Each rule consists of a predicate of potential matches and a corresponding action (called a target) which is executed if the predicate is true; i.e. the conditions are matched. iptables is the user utility which allows you to work with these chains/rules. Most new users find the complexities of linux IP routing quite daunting, but, in practice, the most common use cases (NAT and/or basic Internet firewall) are considerably less complex.
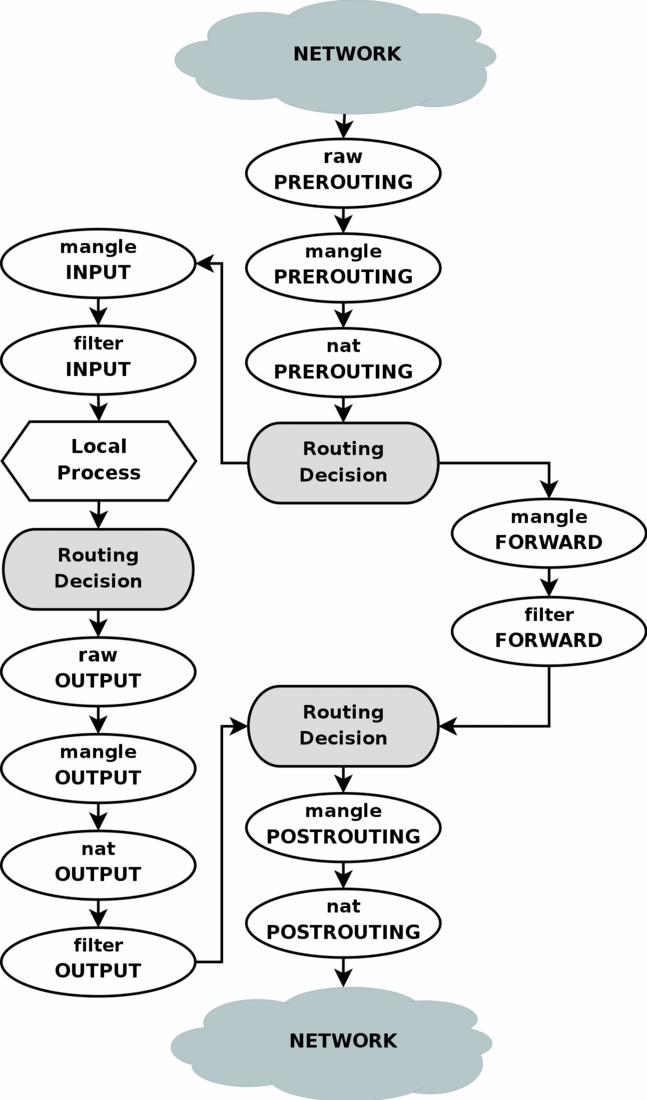
The key to understanding how iptables works is this chart. The lowercase word on top is the table and the upper case word below is the chain. Every IP packet that comes in on any network interface passes through this flow chart from top to bottom. A common source of confusion is that packets entering from, say, an internal interface are handled differently than packets from an Internet-facing interface. All interfaces are handled the same way; it's up to you to define rules that treat them differently. Of course some packets are intended for local processes, hence come in from the top of the chart and stop at <Local Process>, while other packets are generated by local processes; hence start at <Local Process> and proceed downward through the flowchart. A detailed explanation of how this flow chart works can be found here.
In the vast majority of use cases you won't need to use the raw, mangle, or security tables at all. Consequently, the following chart depicts a simplified network packet flow through iptables:
                               XXXXXXXXXXXXXXXXXX
                             XXX     Network    XXX
                               XXXXXXXXXXXXXXXXXX
                                       +
                                       |
                                       v
 +-------------+              +------------------+
 |table: filter| <---+        | table: nat       |
 |chain: INPUT |     |        | chain: PREROUTING|
 +-----+-------+     |        +--------+---------+
       |             |                 |
       v             |                 v
 [local process]     |           ****************          +--------------+
       |             +---------+ Routing decision +------> |table: filter |
       v                         ****************          |chain: FORWARD|
****************                                           +------+-------+
Routing decision                                                  |
****************                                                  |
       |                                                          |
       v                        ****************                  |
+-------------+       +------>  Routing decision  <---------------+
|table: nat   |       |         ****************
|chain: OUTPUT|       |               +
+-----+-------+       |               |
      |               |               v
      v               |      +-------------------+
+--------------+      |      | table: nat        |
|table: filter | +----+      | chain: POSTROUTING|
|chain: OUTPUT |             +--------+----------+
+--------------+                      |
                                      v
                               XXXXXXXXXXXXXXXXXX
                             XXX    Network     XXX
                               XXXXXXXXXXXXXXXXXX
2.1 Tables
iptables contains five tables:
- raw is used only for configuring packets so that they are exempt from connection tracking.
- filter is the default table, and is where all the actions typically associated with a firewall take place.
- nat is used for network address translation (e.g. port forwarding).
- mangle is used for specialized packet alterations.
- security is used for Mandatory Access Control networking rules (e.g. SELinux -- see this article for more details).
In most common use cases you will only use two of these: filter and nat. The other tables are aimed at complex configurations involving multiple routers and routing decisions and are in any case beyond the scope of these introductory remarks.
2.2 Chains
Tables consist of chains, which are lists of rules which are followed in order. The default table, filter, contains three built-in chains: INPUT, OUTPUT and FORWARD which are activated at different points of the packet filtering process, as illustrated in the flow chart. The nat table includes PREROUTING, POSTROUTING, and OUTPUT chains.
See man 8 iptables for a description of built-in chains in other tables.
By default, none of the chains contain any rules. It is up to you to append rules to the chains that you want to use. Chains do have a default policy, which is generally set to ACCEPT, but can be reset to DROP, if you want to be sure that nothing slips through your ruleset. The default policy always applies at the end of a chain only. Hence, the packet has to pass through all existing rules in the chain before the default policy is applied.
User-defined chains can be added to make rulesets more efficient or more easily modifiable. See Simple stateful firewall for an example of how user-defined chains are used.
2.3 Rules
Packet filtering is based on rules, which are specified by multiple matches (conditions the packet must satisfy so that the rule can be applied), and one target (action taken when the packet matches all conditions). The typical things a rule might match on are what interface the packet came in on (e.g eth0 or eth1), what type of packet it is (ICMP, TCP, or UDP), or the destination port of the packet.
Targets are specified using the -j or --jump option. Targets can be either user-defined chains (i.e. if these conditions are matched, jump to the following user-defined chain and continue processing there), one of the special built-in targets, or a target extension. Built-in targets are ACCEPT, DROP, QUEUE and RETURN, target extensions are, for example, REJECT and LOG. If the target is a built-in target, the fate of the packet is decided immediately and processing of the packet in current table is stopped. If the target is a user-defined chain and the fate of the packet is not decided by this second chain, it will be filtered against the remaining rules of the original chain. Target extensions can be either terminating (as built-in targets) or non-terminating (as user-defined chains), see man 8 iptables-extensions for details.
2.4 Traversing Chains
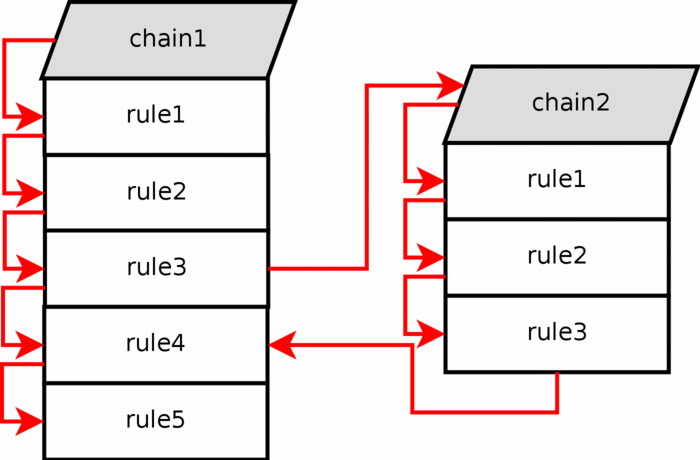
A network packet received on any interface traverses the traffic control chains of tables in the order shown in the flow chart. The first routing decision involves deciding if the final destination of the packet is the local machine (in which case the packet traverses through the INPUT chains) or elsewhere (in which case the packet traverses through the FORWARD chains). Subsequent routing decisions involve deciding what interface to assign to an outgoing packet. At each chain in the path, every rule in that chain is evaluated in order and whenever a rule matches, the corresponding target/jump action is executed. The 3 most commonly used targets are ACCEPT, DROP, and jump to a user-defined chain. While built-in chains can have default policies, user-defined chains can not. If every rule in a chain that you jumped fails to provide a complete match, the packet is dropped back into the calling chain as illustrated here. If at any time a complete match is achieved for a rule with a DROP target, the packet is dropped and no further processing is done. If a packet is ACCEPTed within a chain, it will be ACCEPTed in all superset chains also and it will not traverse any of the superset chains any further. However, be aware that the packet will continue to traverse all other chains in other tables in the normal fashion.
2.5 Modules
There are many modules which can be used to extend iptables such as connlimit, conntrack, limit and recent. These modules add extra functionality to allow complex filtering rules.
3 Configuration and usage
iptables is a systemd service and is started accordingly. However, the service won't start unless it finds an /etc/iptables/iptables.rules file, which is not provided by the Parabola iptables package. So to start the service for the first time:
# touch /etc/iptables/iptables.rules
or
# cp /etc/iptables/empty.rules /etc/iptables/iptables.rules
Then start the iptables.service unit. As with other services, if you want iptables to be loaded automatically on boot, you must enable it.
iptables rules for IPv6 are, by default, stored in /etc/iptables/ip6tables.rules, which is read by ip6tables.service. You can start it the same way as above.
[Unit]
Wants=network-pre.target
Before=network-pre.target
If the system uses the ip6tables.service, do the same as above. For more details see this systemd bug report, this systemd documentation and Issue#33478.
After adding rules via command-line as shown in the following sections, the configuration file is not changed automatically — you have to save it manually:
# iptables-save > /etc/iptables/iptables.rules
If you edit the configuration file manually, you have to reload iptables.
Or you can load it directly through iptables:
# iptables-restore < /etc/iptables/iptables.rules
3.1 From the command line
3.1.1 Showing the current rules
The basic command to list current rules is --list-rules (-S), which is similar in output format to the iptables-save utility. The main difference of the two is that the latter outputs the rules of all tables per default, while all iptables commands default to the filter table only.
When working with iptables on the command line, the --list (-L) command accepts more modifiers and shows more information. For example, you can check the current ruleset and the number of hits per rule by using the command:
# iptables -nvL
Chain INPUT (policy ACCEPT 0 packets, 0 bytes)
 pkts bytes target     prot opt in     out     source               destination

Chain FORWARD (policy ACCEPT 0 packets, 0 bytes)
 pkts bytes target     prot opt in     out     source               destination

Chain OUTPUT (policy ACCEPT 0 packets, 0 bytes)
 pkts bytes target     prot opt in     out     source               destination
If the output looks like the above, then there are no rules (i.e. nothing is blocked) in the default filter table. An other table can be specified with the -t option.
To show the line numbers when listing rules, append --line-numbers to that input. The line numbers are a useful shorthand when #Editing rules on the command line.
3.1.2 Resetting rules
You can flush and reset iptables to default using these commands:
# iptables -F
# iptables -X
# iptables -t nat -F
# iptables -t nat -X
# iptables -t mangle -F
# iptables -t mangle -X
# iptables -t raw -F
# iptables -t raw -X
# iptables -t security -F
# iptables -t security -X
# iptables -P INPUT ACCEPT
# iptables -P FORWARD ACCEPT
# iptables -P OUTPUT ACCEPT
The -F command with no arguments flushes all the chains in its current table. Similarly, -X deletes all empty non-default chains in a table.
Individual chains may be flushed or deleted by following -F and -X with a [chain] argument.
3.1.3 Editing rules
Rules can be edited by appending -A a rule to a chain, inserting -I it at a specific position on the chain, replacing -R an existing rule, or deleting -D it. The first three commands are exemplified in the following.
First of all, our computer is not a router (unless, of course, it is a router). We want to change the default policy on the FORWARD chain from ACCEPT to DROP.
# iptables -P FORWARD DROP
3.2 Guides
4 Logging
The LOG target can be used to log packets that hit a rule. Unlike other targets like ACCEPT or DROP, the packet will continue moving through the chain after hitting a LOG target. This means that in order to enable logging for all dropped packets, you would have to add a duplicate LOG rule before each DROP rule. Since this reduces efficiency and makes things less simple, a logdrop chain can be created instead.
Create the chain with:
# iptables -N logdrop
And add the following rules to the newly created chain:
# iptables -A logdrop -m limit --limit 5/m --limit-burst 10 -j LOG
# iptables -A logdrop -j DROP
Explanation for limit and limit-burst options is given below.
Now whenever we want to drop a packet and log this event, we just jump to the logdrop chain, for example:
# iptables -A INPUT -m conntrack --ctstate INVALID -j logdrop
4.1 Limiting log rate
The above logdrop chain uses the limit module to prevent the iptables log from growing too large or causing needless hard drive writes. Without limiting an erroneously configured service trying to connect, or an attacker, could fill the drive (or at least the /var partition) by causing writes to the iptables log.
The limit module is called with -m limit. You can then use --limit to set an average rate and --limit-burst to set an initial burst rate. In the logdrop example above:
iptables -A logdrop -m limit --limit 5/m --limit-burst 10 -j LOG
appends a rule which will log all packets that pass through it. The first 10 consecutive packets will be logged, and from then on only 5 packets per minute will be logged. The "limit burst" count is reset every time the "limit rate" is not broken, i.e. logging activity returns to normal automatically.
4.2 Viewing logged packets
Logged packets are visible as kernel messages in the systemd journal.
To view all packets that were logged since the machine was last booted:
# journalctl -k | grep "IN=.*OUT=.*" | less
4.3 syslog-ng
Assuming you are using syslog-ng, you can control where iptables' log output goes this way:
filter f_everything { level(debug..emerg) and not facility(auth, authpriv); };
to
filter f_everything { level(debug..emerg) and not facility(auth, authpriv) and not filter(f_iptables); };
This will stop logging iptables output to /var/log/everything.log.
If you also want iptables to log to a different file than /var/log/iptables.log, you can simply change the file value of destination d_iptables here (still in syslog-ng.conf)
destination d_iptables { file("/var/log/iptables.log"); };
4.4 ulogd
ulogd is a specialized userspace packet logging daemon for netfilter that can replace the default LOG target. The package ulogd is available in the [community] repository.
5 See also
- Wikipedia article
- Port knocking
- Official iptables web site
- iptables Tutorial 1.2.2 by Oskar Andreasson
- iptables Debian Debian wiki